top of page
Atavism by Parallel Minds, a spectral plugin that makes a pad out of the track itself

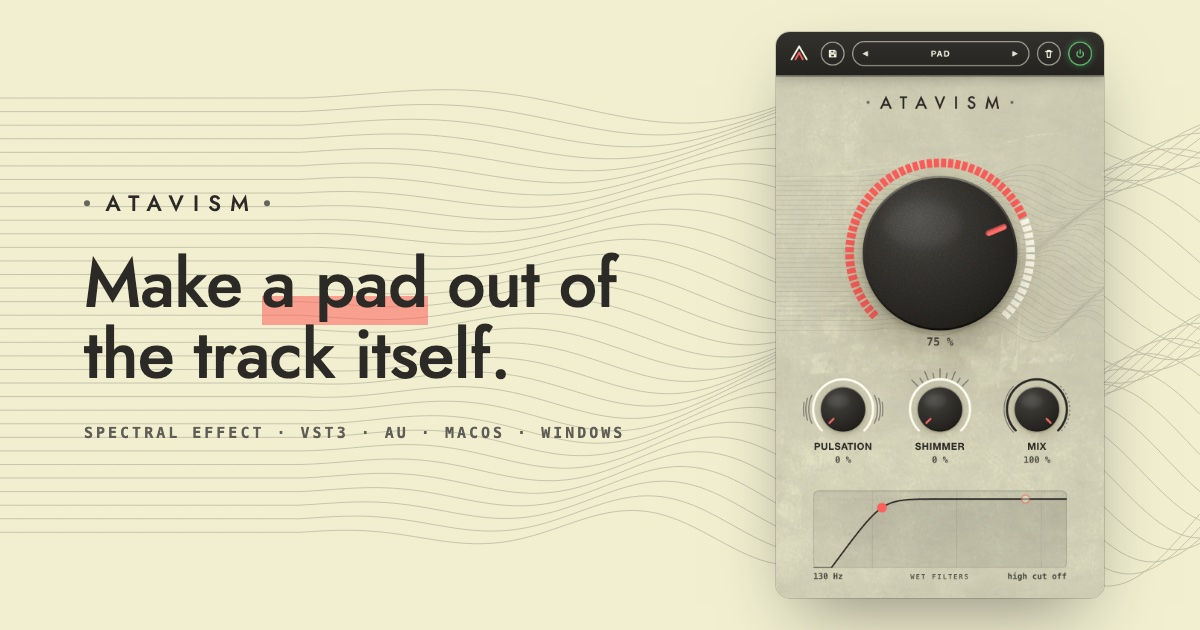
Atavism is a spectral effect plugin from Parallel Minds that turns a track into a pad made of its own harmony. You put it on a track, a bus or the master and turn one knob: the hits fade out, the notes that ring keep ringing, and the pad follows every chord change in time with the song. It costs $39, runs as VST3 and AU on macOS and as VST3 on Windows, and has eight presets and nine automatable parameters. This guide covers what each control does, how Atavism relates to Paulstretch, shimmer reverbs and freeze effects, how to use it in band music, and why we think a pad made from the take beats one added on top.


Parallel Minds is a one-person studio in Lyon, France, run by William Garrido. Its first release, Reverie, turns thirty seconds of any recording into long ambient pieces. Atavism, released in September 2026, takes the same spectral thinking and puts it inside the song, on the timeline, as an ordinary insert effect.


Atavism at a glance

  • What it is: a spectral effect that makes a pad out of whatever audio it sits on.

  • Price: $39 (€39) from Parallel Minds. One-time purchase, one licence for macOS and Windows. It launched at $29 (€29) until 24 October 2026.

  • Formats: VST3 and AU on macOS 11 or later (Universal), VST3 on Windows 10 and 11. There is no AAX version, so Pro Tools is not covered yet.

  • Controls: one main knob, then Pulsation, Shimmer and Mix, plus a low cut and a high cut that act on the pad only.

  • Presets: eight (Init, Pad, Wings, Halo, Breathing, Octave, Distant, Trace), and you can save your own.

  • Latency: around 300 ms, compensated by the DAW. Short mode brings it down to 170 ms.

  • Licence and demo: offline key, no account. The demo is the full plugin with a two-second mute at the end of every minute.


What Atavism actually does

Most ambient effects add something to a sound: a room, an echo, a frozen slice. Atavism works the other way round. It takes away the timing of a sound and keeps its harmony.


Parallel Minds describe the process in four steps. The plugin separates what rings from what hits, and lets the hits go. It keeps the notes that stand out and drops the noise underneath them. It smears each moment forward over the seconds that follow. Past 75% on the knob it does that smear a second time, until only the lines that persist are left.


Two details set it apart. The smear only goes forward, so nothing sounds before the note is played. And nothing is held or stretched. When the chord changes, the pad changes with it, and the song keeps its length and its place on the timeline. Stop the music and the pad swells for a few seconds, then goes out on its own.


That is why the developer insists on what Atavism is not: a reverb, a delay, a freeze, a time stretcher or a synth. There is no pitch tracking and nothing is triggered. The pad is made from partials that are already in the sound, which is why, in their words, "it cannot play a wrong note."


The controls, explained

  • The main knob: the distance from the track to its pad. At 25% the attacks are gone and the groove is only hinted at. At 100% only the sustained lines are left.

  • Pulsation: a slow, irregular swell, so a long pad does not sit still.

  • Shimmer: grows the octave above inside the pad. Because it is built from the pad, it stays in key.

  • Mix: dry to wet, always in time with the track. Fully wet gives you a pad on its own track. 35 to 60% sits it under the track it comes from.

  • Low cut and high cut: two filters on the pad only. The low cut keeps the pad away from the bass, the high cut takes the air off it. The dry track is never filtered.


Every knob learns a MIDI controller with a right-click, and a bounce with the same settings comes out the same every time, Pulsation included.


How to use Atavism in band music

Under the chorus: a pad that was already in the room

Put Atavism on the band bus or the guitar bus with Mix around 40%. The Wings preset is made for exactly this. Raise the low cut until the pad stays clear of the bass. What you get under the chorus is not a new instrument. It is the chords the band already played, held between the hits.


Outros and breakdowns: dissolve the drums

Automate the main knob from zero to full over the last bar of a section. The drums fade into the chord, and the band seems to melt instead of stop. It suits the end of a song or the bar before the last chorus.


Intros: start from the song itself

Bounce the first phrase fully wet and place it in front of the song. The intro is then made of the song's own harmony, so it leads into the first chord without a join.


Guitars and vocals: a held cloud on a send

A guitar chord, a vocal line or a room recording at full knob with Shimmer becomes a held cloud about an octave wide. Keep it on a send so the dry signal stays direct. If you want to play through it, use Short mode.


Live recordings: mind what you feed it

On a one-take recording, everything in the microphone is part of the source, bleed included. Start on a bus or a room microphone instead of a single close mic, and use the two filters to keep the pad out of the low end.


Why a pad made from the take matters

Our opinion: most ambient plugins make any input sound expensive, and that is the problem. The result belongs to the plugin, not to the band. Wash is easy. A song is hard.


What we like about Atavism is where the pad comes from. Most of what we do is bands in a room, one take, every microphone hearing every instrument. When a record like that needs something under the last chorus, the usual answer is an overdub: a synth or an organ that was never in the room. A pad made out of the take itself is a different thing. It is still the band, and it keeps the shared sound of the room that we wrote about in how we mix live recordings.


It also fits the kind of tool we like. We mix in a hybrid analog setup because hardware makes you decide early: a compressor you print on the way in, a tape echo you ride by hand, a pedal the guitarist plays through instead of an effect added later. The plugins we keep are the ones that behave the same way. One knob is a decision, not a menu. We would rather own a tool that does one strange thing properly than one that does forty normal things.


The rule is the same as with any strong effect. Use it on purpose, in one place, and commit to it. A pad under every song is wallpaper. A pad that arrives once, made from the chord the band is already playing, is an arrangement choice.


Atavism compared to similar plugins

Atavism has relatives, and knowing them makes it easier to see what is new.

  • Paulstretch: Paul Nasca's free extreme time stretch is the sound many people will think of first. Slow anything down far enough and it becomes a drone. Paulstretch makes the audio longer. Atavism stays in time with the song. Parallel Minds know that territory, since Reverie uses Paulstretch as one stage of its engine.

  • Shimmer reverbs: the octave-up reverb that goes back to Brian Eno and Daniel Lanois in the 1980s, and that Valhalla Shimmer made a standard. Atavism's Shimmer puts the octave inside the pad instead of on a reverb tail.

  • Freeze effects: an Electro-Harmonix Freeze, or the freeze button on a reverb, grabs one moment and holds it. Atavism holds nothing. It follows the chords.

  • Zynaptiq Adaptiverb: the closest relative in thinking. It builds a reverb tail from the harmonic content of the input instead of from room reflections, and keeps that tail in tune. It is a much deeper tool and costs several times as much. We have written about Zynaptiq's Wormhole before.

  • Eventide Physion Mk II: splits a sound into its transient and tonal parts so you can treat each on its own. Mute the transients on a guitar and you are in the same neighbourhood. Physion is a toolbox with hundreds of presets. Atavism is one decision.

  • Granular plugins: Output Portal and its kind chop a sound into grains and scatter them. You get clouds too, but they drift away from the song's timing. Atavism's stay locked to it.


How Atavism might fare

We think it has a real chance. You can say what it does in one sentence, and most plugins cannot manage that. The price is low enough to try on a hunch. The demo is the whole plugin, the key works offline and there is no account to create, which is how a small developer earns trust.


Film and game composers will probably get there first, because turning a cue into its own underscore saves them real time. For bands, the obvious places are intros, outros and the bar before the last chorus.


Two things hold it back for now. There is no AAX version, so studios on Pro Tools cannot open it. And 300 ms of latency is fine in a mix but too much for monitoring through an insert while you play, which is why Short mode on a send exists.


The harder part is the shelf it sits on. There are a lot of ambient plugins, and "not a reverb" takes a sentence to explain. But a plugin built around one clear idea tends to outlast a big one with none, and Atavism is all one idea.


Parallel Minds Atavism FAQ

What does Atavism do?

Atavism turns the audio it is placed on into a pad made from that audio's own harmony. Hits fade, sustained notes stay, and the pad follows the chord changes in time with the song.


Is Atavism a reverb?

No. There is no room and no decaying tail, nothing repeats, and nothing is frozen or stretched. It removes the timing of a sound and keeps its harmony.


How is Atavism different from Paulstretch?

Paulstretch makes audio longer by stretching it. Atavism does not change the length of anything. The pad stays on the timeline and changes with the chords.


Does Atavism work in Pro Tools?

Not at the moment. It is VST3 and AU on macOS and VST3 on Windows. There is no AAX version.


How much latency does Atavism add?

Around 300 ms, compensated by the DAW, or 170 ms in Short mode. For playing through it, put it on a send so the dry signal stays direct.


How much does Atavism cost?

$39 as a one-time purchase covering macOS and Windows. It launched at $29 until 24 October 2026. The free demo is the full plugin with a two-second mute every minute.


Keep reading


Made a record where the take is the point? We mix shoegaze, post-punk and indie rock for artists who want the performance kept, not replaced. Send us the rough mix.

Writer: Tapetown
Tapetown
4 min read

Updated: 4 days ago


On vintage microphone worship, the credential that hangs from a stand, and the ears that stopped being necessary


The conversation happens before the session starts. Sometimes in the booking email, sometimes in the first phone call, sometimes in the studio doorway before the cases are even open. What microphones do you have? The question is asked the way people ask about wine lists at restaurants they are nervous about — not because they know enough to evaluate the answer properly, but because the asking signals that they are the kind of person who knows to ask.

The answer is checked against a mental list assembled from forum posts and YouTube videos and the vocal chain sections of interviews with engineers who made records thirty years ago in circumstances that have no relationship to this session, this room, this singer, this song. The Neumann U47 is on the list. The AKG C12 is on the list. Certain vintage RCA ribbons are on the list. The list is not the engineer's list. The list belongs to the mythology and the engineer has absorbed it and is now auditioning the studio against it and will feel better or worse about the session depending on how much of the mythology is present in the mic locker.

Nobody on either side of this conversation has yet listened to the singer sing.

The microphone is a transducer. The voice is the instrument.

A microphone converts acoustic energy into electrical signal. Every microphone does this differently, with different frequency responses, different transient characteristics, different behaviors at different distances and different sound pressure levels. These differences are real and they matter and choosing the right microphone for a source is a genuine engineering skill that requires knowledge of the equipment and knowledge of the source and the ability to relate the two.

The U47 is a remarkable piece of engineering. It has a character that works extraordinarily well on certain voices in certain rooms at certain distances doing certain things. It has also been on enough iconic recordings that its name carries a weight entirely disproportionate to its actual superiority over every other microphone ever made, and that weight is now being used as a substitute for the actual process of finding the right microphone for this voice in this room.

A singer with a lot of proximity effect and a naturally dense low-mid buildup being placed in front of a U47 because the U47 is the correct microphone will produce a recording that is thick and congested and needs significant corrective EQ, which the phase correlation police will then object to, and what has been created is a chain of decisions made by mythology rather than ears producing a result that serves nobody.

The correct microphone is the one that sounds right on the source. Finding it requires listening. Listening requires placing the singer in front of microphones and hearing what happens. Sometimes the right microphone is a U47. Sometimes it is a small diaphragm condenser that no one has written a forum post about. Sometimes it is a dynamic microphone that the vintage worship community considers beneath serious consideration and that sounds more honest and alive on a particular voice than anything in the hallowed locker.

The mythology cannot tell you which one. Only the listening can.

Vintage equipment earned its reputation in specific contexts that are not your context.

The recordings that made certain microphones legendary were made by engineers who were not thinking about the microphone's reputation. They were thinking about the voice and the song and the session and what the moment needed, and they reached for something that served those things, and it worked, and the microphone got credit for a decision that was actually about listening.

The worship that accrued to the equipment afterward stripped the listening out of the story. What remained was the object and the mythology, and the mythology spread and the object became a credential, and the credential is now being presented in booking emails as evidence of quality before a single person has walked into the room.

Frank Sinatra sounded like Frank Sinatra because of what Frank Sinatra did with his voice and his breath and his relationship to a lyric developed over decades of performing. The microphone captured it. The microphone did not produce it, did not improve it, did not transform an ordinary performance into an extraordinary one through the superiority of its capsule design. The performance was the thing. The microphone was present for it.

A great microphone on a performance without that depth produces an expensive recording of something ordinary. An ordinary microphone on a performance with that depth produces a document of something real. The mythology has these priorities exactly reversed and has convinced an entire community of engineers and artists and studio owners to organize their professional identities around the object rather than the listening, which is the most effective way ever devised to sound technically serious while missing the point entirely.

The engineer who knows the mic locker before they know your voice is the wrong engineer.

Tapetown has microphones with opinions. Equipment that does things to sound that we have spent years learning to use deliberately. We choose what goes in front of a singer after hearing the singer, not before. Sometimes the choice is expensive and vintage and confirms the mythology. More often it is whatever tells the truth about the voice most directly, regardless of what forum it has never been discussed on.

The session where the mic choice is made in the booking email is a session where the most important decision has been made by reputation rather than listening, and reputation cannot hear what is happening in the room, and the room is where everything that matters actually happens.


Stop asking what microphones we have. Come in and sing. We will find what tells the truth about your voice and we will use that, and the conversation about what it is can happen afterward if it needs to happen at all.


It usually doesn't.


More about who we are and how we work is on the about page.

Every indie rock mix I hear from home producers seems to wrestle with one question: how loud should the vocal be? Push it too far forward and the song loses its edge, bury it too deep and nobody hears the words. The answer is not a fixed level. It depends on the song, the arrangement, and the emotional center of the performance. This article walks through the decision boundaries, the techniques, and the mindset that keeps indie vocals right where they belong.

Indie Rock Mixing: Vocals Up Front or Buried?


The Pop Vocal Rulebook Doesn't Apply


Pop mixing treats the vocal as the absolute center of gravity. The kick, bass, and snare lock around it, the stereo width collapses in the vocal section, and the level sits so far forward that every syllable hits you in the chest. That approach works for pop because pop is about the vocalist and the hook. The arrangement serves the voice.


Indie rock is different. The voice is often one element among several that carry the song. The guitar riff, the drum groove, the bass line, the atmospheric pad, they all pull weight. A mix that puts the vocal 6 dB above everything else flattens the energy. It tells the listener "this is the important part, the rest is decoration." For a lot of indie, post-punk, and shoegaze, the rest is not decoration. The interaction between parts is the point.


I have mixed records where the vocal sits quieter than the snare and the listener still feels every word. The trick is not volume, it's clarity, placement, and dynamic contrast. When the vocal is allowed to sit inside the band instead of on top of it, the song breathes differently. The band sounds like a band, not a backing track.


Where Should Indie Vocals Sit?


There is no single number, but a useful starting point is to aim for the vocal to be perceptibly present without dominating. In a typical mix, the vocal might average around 4 to 6 dB quieter than a pop vocal would, relative to the same instrumental bed. That sounds drastic, but the ear adapts quickly. The vocal still cuts through because of its spectral content and dynamic shape, not because of pure level.


The real decision comes from listening to the song's emotional arc. In a verse that builds tension, the vocal can sit deeper, almost swallowed by the guitars. When the chorus hits, the vocal can rise, but it does not need to leap 8 dB. A subtle lift of 2 or 3 dB, combined with a slight compression change or a reverb tail shortening, can create the illusion of the vocal stepping forward without upsetting the balance.


I often set the vocal level while listening to the whole mix at a moderate volume, then walk away and come back. If the first thing I notice is the vocal, it is probably too loud. If I have to strain to catch the words, it is too quiet. The sweet spot is when the vocal feels integrated, you hear it clearly but you are also hearing the kick drum and the guitar interplay at the same time.


Techniques for Vocal Balance


Getting the vocal to sit right without pushing the fader too high requires a few deliberate moves.


EQ for Clarity, Not Volume


Cutting the low mids around 200 to 400 Hz on the vocal reduces boxiness and lets the voice sit in a cleaner pocket. A gentle high shelf above 5 kHz adds air without making it sound brittle. But the bigger gain comes from carving the instruments around the vocal. A narrow dip on the guitars at 2 to 3 kHz, where vocal presence lives, can give the voice space to cut through without raising its level. Audio equalization) is not just about the vocal channel, it is about the whole arrangement.


Compression for Consistency, Not Squash


Indie vocals often have wide dynamic range, a quiet verse and an intense chorus. A compressor with a ratio around 3:1, medium attack, and fast release will even out the peaks without killing the life. Do not let the gain reduction exceed 4 or 5 dB on the loudest sections; if it does, the vocal starts to sound clamped and loses the emotional variation. Dynamic range compression should serve the performance, not correct it.


Reverb and Space


A vocal that sits back in the mix often benefits from a reverb that is not too wet. A short room reverb with a decay under one second can glue the voice into the same space as the drums and guitars. A longer plate or hall can push it further back, but too much reverb will make the vocal feel distant and unclear. The goal is depth, not escape. Reverberation is a tool for placement, not just ambience.


Automation as Performance


One of the most powerful tools is automation. In a pop mix the vocal level is often automated to stay consistent. In indie rock I automate to follow the emotional shape. A loud guitar riff in the bridge might need the vocal to drop a dB or two so the riff hits harder. The chorus might get a subtle lift. Automation lets the vocal breathe with the arrangement.


When to Push Them Back


Sometimes the right call is to let the vocal sit lower than you think. I have worked on shoegaze mixes where the vocal is barely above the noise floor of the guitars, and that is exactly what the song needed. The voice becomes a texture, an instrument, not a narrator. The listener leans in, and that engagement is more powerful than being shouted at.


The same can happen in post-punk. A deadpan vocal delivered quietly over a driving bass and drum machine can create tension that a loud vocal would destroy. The vocal becomes part of the atmosphere.


The key is intention. If you are burying the vocal because you are unsure of the level, that is a problem. If you are burying it because the song demands it, that is a creative choice. Trust your ears, and check the mix against a reference from the same genre. A lot of classic indie records have vocals that sit surprisingly low compared to modern pop standards.


Listening in Context


The biggest mistake I see in home mixes is soloing the vocal and setting it alone, then bringing it into the mix and wondering why it sounds wrong. The vocal only makes sense in relation to everything else. I never set a vocal level without the full arrangement playing, and I rarely adjust it with the fader alone. I listen to how it interacts with the snare, the guitar distortion, the bass. If the vocal is fighting the snare at 200 Hz, I fix the snare EQ, not the vocal fader.


Another habit: check the mix on different systems. A vocal that sounds perfectly integrated on headphones might vanish on laptop speakers. A vocal that cuts through on studio monitors might be harsh on earbuds. Find a translation point that works across at least two or three playback systems before finalizing.


The Indie Rock Mindset


Mixing indie rock vocals is not about following a recipe. It is about listening to the song and asking what the vocal needs to do. If the song is a quiet, intimate ballad, the vocal belongs front and center, intimate and close. If the song is a loud, chaotic wall of guitars, the vocal can be part of the wall. The rule is simple: the mix serves the song, not the other way around.


For more on this philosophy, check out my article on Indie Rock Mixing: Why Pop Templates Ruin It. And if you are trying to decide whether a professional mix is right for your next release, What Does Professional Mixing Cost in 2026? Honest Numbers for Indie Artists offers a realistic breakdown.


FAQ


Should indie vocals always sit lower than pop vocals?


Not always, but often. Indie rock tends to treat the vocal as one voice among many, rather than the sole focus. The level should match the song's arrangement and emotional intent. A sparse acoustic indie folk track might need a prominent vocal, while a dense shoegaze track benefits from a buried one.


How do I know if my vocal is too loud or too quiet?


Listen at a low volume. If the vocal is the first thing you hear, it is probably too loud. If you cannot understand the words on first listen, it is too quiet. Compare to a reference mix in the same genre, and trust your instinct after taking a short break.


What EQ frequencies matter most for indie vocal clarity?


The presence range around 2 to 4 kHz is critical for intelligibility. A gentle boost there can help the vocal cut through without raising the fader. Also clear out mud between 200 and 400 Hz on the vocal, and dip competing instruments in that same range.


Should I compress indie vocals differently than pop vocals?


Yes. Pop vocals are often heavily compressed for consistency and loudness. Indie vocals benefit from lighter compression that preserves dynamic variation. A ratio of 3:1 with moderate gain reduction is a good starting point. Let the performance breathe.


Is automation better than compression for vocal level?


Both are useful. Compression handles broad dynamic range, automation handles phrase-by-phrase emotional shaping. Use compression to even out the vocal, then automate the fader to follow the song's structure. Together they give you control without smashing the life out of the track.


Getting the vocal balance right in an indie rock mix comes down to listening, context, and courage. It is easy to push the vocal up until it feels safe, but the best mixes take a risk. The vocal sits where the song wants it, not where the meter says.


Ready for a mix that keeps your indie rock vocal right where it belongs? Get your mix release-ready with professional mixing that respects the song.


More on mixing indie rock


This guide is part of how we mix indie and alternative records at Tapetown. Send us the rough mix through our online mixing service, or read more about indie rock mixing. We also work with post-punk and shoegaze bands.

bottom of page