


Escaping the Concrete Basement: Taming Mud and Reflections in DIY Recordings
Updated: Aug 29
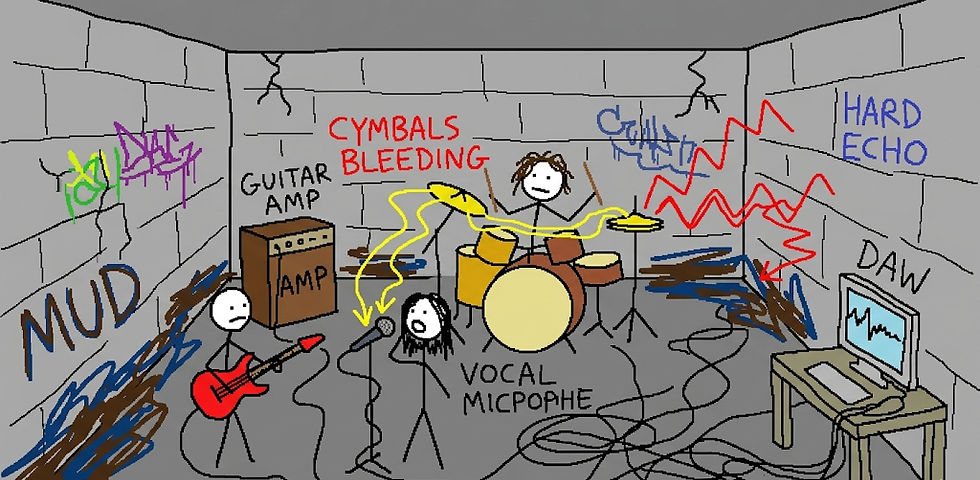
Rescuing the Vibe
Recordings from basements or DIY venues are plagued by extreme low mid buildup (mud) and harsh, immediate reflections from hard concrete surfaces.
Concrete causes intense, chaotic acoustic energy buildup. The room lacks absorption, so bass frequencies collect in corners while flat walls create hard, distracting echoes that destroy phase coherence.
Aggressive use of high pass filters is essential. Every non-bass instrument must be filtered to clear physical space for the kick drum and bass guitar.
Use surgical EQ to cut specific resonant frequencies (often between 200Hz and 500Hz), employ dynamic processing for cymbal wash, and use parallel saturation to thicken the track without muddying it.
How hybrid analogue summing adds the necessary 3D depth and separation to a cluttered, narrow basement mix, replacing digital harshness with analog weight.
The Charm and Chaos of Unconventional Spaces
There is undeniable, raw energy in a DIY show. Whether it is a packed house concert, an underground punk gig, or a gritty concrete basement venue, the lack of pretension often leads to the most passionate musical performances. The band is not overthinking their takes. They are feeding off the crowd, sweating, and pushing their amplifiers to the limit. We discuss this exact mindset in our masterclass on the Anatomy of a Live Session. Authenticity over perfection is everything.
However, when the gig is over and you load those raw multitrack files into your DAW, the acoustic reality hits you fast. The recording environment was an absolute nightmare. Unlike a purpose-built commercial studio with calculated geometry, floating floors, and custom broadband diffusion, a basement is usually just a hard, rectangular concrete box with a low ceiling.
When you push up the faders, the mix will sound suffocated, narrow, and incredibly cluttered. You will hear a massive buildup of low-end rumble that makes the whole band sound like they are playing underwater. The drums will lack transient attack, drowned out by the harsh reflections of the snare hitting the concrete wall behind the drummer. Do not panic. At Tapetown, we specialize in environmental triage. Here is the comprehensive engineering roadmap for taking a chaotic DIY recording and turning it into a massive, punchy mix.
The Physics of the Concrete Box
To fix the audio, you first have to understand what the room did to the sound waves. Concrete is highly reflective. It does not absorb acoustic energy; it bounces it directly back into the room.
In a typical basement, the dimensions are small. When the bass player hits a low note, that sound wave physically travels across the room, hits the concrete wall, and bounces back. Because low frequencies have very long wavelengths, these bouncing waves collide with each other, creating "standing waves." This causes certain bass notes to sound twice as loud, while other notes disappear completely.
Simultaneously, the low ceiling forces the sound of the cymbals directly down into the vocal microphones. The entire acoustic space is a chaotic soup of phase cancellation and frequency masking.
Triage Step One: Aggressive High Pass Filtering
The very first action in the mixing process is the most critical: you must deploy high pass filters across the board. In a small, hard room, low-frequency energy builds up exponentially. Bass frequencies are omnidirectional, meaning they wrap around physical objects and bleed into every single microphone on the stage. The vocal mic picks up the bass amp. The guitar mics pick up the kick drum.
The Fix: You must be relentless with your filtering. In a dense rock or punk mix, the kick drum and the bass guitar own the space below 100Hz. That is their designated real estate. Every other track—including the vocals, the heavy distorted guitars, the snare drum, and the drum overheads—must be high-passed until that low-mid mud disappears.
If you leave 60Hz rumble in the vocal microphone, it will fight the bass guitar for headroom. By strictly filtering out the low-end garbage from the microphones that do not need it, you instantly clear physical space. This allows the fundamental frequencies of the rhythm section to sit firmly on the 3D soundstage, providing the physical impact that live music demands.
Surgical EQ: Controlling the "Gonk" and "Honk"
Even after you filter out the sub-bass rumble, your mix will likely have a "cheap" or "boxy" quality. This is caused by the specific, harsh resonant frequencies of the concrete walls. These problem frequencies usually gather in the low-mids, between 200Hz and 500Hz. Engineers often refer to this buildup as "gonk," "honk," or "boxiness." It destroys the clarity of the lead vocal and makes the snare drum sound like a plastic bucket.
The Fix: Using a surgical, high-Q equalizer (a digital EQ with a very narrow, sharp band), you must go hunting. Solo the drum bus or the guitars, boost a narrow band of EQ, and sweep it slowly through the low-mid range. You will eventually hit a frequency that resonates terribly and makes your ears ring.
Once you find that exact resonant frequency, pull it down sharply by 3 to 6 decibels. You are not changing the tone of the instrument; you are surgically removing the "room sound" from the microphone. This makes the instrument sound focused, tight, and expensive, allowing it to sit in the mix without triggering the room’s harsh acoustic reflections.
The Bleed Factor: Cymbals and Low Ceilings
Basements notoriously have low ceilings, often just seven or eight feet high. When a drummer hits a crash cymbal, the high-frequency energy hits that low ceiling instantly and ricochets directly into the singer's vocal microphone. If you compress the vocal track normally, you will drag that harsh cymbal wash right to the front of the mix.
The Fix: We utilize dynamic EQ or creative de-essing to handle this specific environmental bleed. Set up a dynamic EQ on the vocal track, targeting the 6kHz to 9kHz range. Program the EQ so it only dips those frequencies when the harsh cymbals peak. This tames the overhead reflections automatically without permanently dulling the singer's voice. It is a necessary modern technique for salvaging vocals recorded in unoptimized spaces.
Handling the Slap Back: Sparing the Reverb
In a concrete room, the mid-range reflections are immediate. When the snare drum is hit, the sound bounces off the back wall and hits the microphones again milliseconds later, creating a hard "slap back" echo.
The biggest amateur mistake is trying to cover this up by adding a massive digital hall reverb plugin. If you add artificial reverb to a recording that is already choked with chaotic room reflections, the mix will instantly dissolve into an unlistenable, muddy mess.
The Fix: Instead of reverb, use an analog-style tape delay. A dark, filtered slap delay blends into the existing room sound much better than a bright digital reverb. It adds depth and dimension to the vocal without contributing to the high-frequency clutter.
The Tapetown Advantage: Hybrid Summing for Separation
The fundamental issue with a chaotic DIY recording is that everything feels merged. The instruments fight for space, lacking perceived depth or width. Mixing "in the box" (purely digital) can actually exacerbate this problem. Digital math perfectly sums the chaotic audio, often leading to a mix that feels narrow, flat, and claustrophobic.
This is where the Analog vs Digital Paradox works heavily to our advantage. At Tapetown, we utilize an analogue hybrid workflow to save chaotic live recordings. We separate the crucial elements of the basement mix—sending the kick drum, bass, vocals, and guitars out of the computer and through our physical audio consoles and summing mixers.
The physical act of running these digital signals through analog transformers, vacuum tubes, and discrete circuitry introduces subtle harmonic depth. The analog gear reacts to the transients differently than digital algorithms. It softens the harsh, spiky reflections of the concrete walls and adds natural, physical separation between the instruments. This analog workflow provides the sonic authority and width that allows a gritty basement recording to stand up next to a polished studio release.
Restoring the Raw Nerve
A chaotic recording from a DIY venue will never sound like a sterile, isolated pop record—and that should never be the goal. The objective is to harness the intense physical energy of the environment while controlling the acoustic mud and harsh reflections that distract the listener.
By focusing on aggressive high-pass filtering, surgical frequency control, smart dynamic processing, and utilizing the unique 3D separation provided by analog hardware, we rescue the vibe of the show. We deliver a mix that is visceral, heavy, and authentic. The acoustic chaos of the room is tamed, leaving only the raw nerve of the band.
References & Further Reading
Explore Tape Op Magazine's deep dive on the acoustic realities of residential and small rooms: Sondhus Room Acoustics.
Access detailed guides on managing low-mid mud and mix mistakes via Sound on Sound: Mix Mistakes: Cleaning the Low End.
Delve into technical papers on small room acoustic modal buildup at the Audio Engineering Society E-Library.
Read our foundational philosophy on capturing the energy of raw musical performances in The Anatomy of a Live Session.
Discover how our hybrid workflow creates separation and weight in your mix in The Analog vs Digital Paradox.
Contrast purposeful design with Purposeful Chaos in our deep dive into Muscle Shoals.


